
My Five Top Tips
Let’s talk about posture…..there’s so much to it, right? It makes you want to lay down on your couch and forget about it! Naaaaah. Don’t do it! You’ve got this! I’m going to give you 5 tips to make working on your alignment easier.
Listen, the pandemic has been hard on our bodies in so many ways. For most of us, we have spent way more time in our homes, which meant more sitting. Whether that was working remotely or for relaxation such as tv, reading, or playing games, we sat more. We even worked more. Darn, that work became more convenient! You’ve hard me say it before, when you were at the office and needed to use the restroom, you had to walk further than you do at home. As you walked back, you might have stopped by your co-worker’s desk and had a quick chat. Now people are sitting at their desks and chatting over Zoom, so there’s less standing and it’s important for our bodies to stand.
As you look at people’s bodies you will see more shoulders rounded forward, spines are curved, heads and necks are forward, and people are hinged forward due to tight hips. Ouch! There’s no judgment there! I promise. It’s a natural result of so much sitting and from gravity pulling us forward. We are going to work on this together.
The good news is gone are the days of our moms sticking a fingernail in our backs to get us to stand up straight. I hope so anyway. There are easier ways to go about it. You need to know that it takes patience because we have to have the strength to hold our spines in alignment after many years of not doing it. It also takes some perseverance. You will have to remind yourself over and over as you work on these tips and that’s ok! It takes time and we have time. You can practice my five tips preferably standing, but also while sitting - at your desk, your dining/kitchen table, etc.
Let’s get started!
#1 - Our Feet 🦶🏼
We are starting with our base, the feet. Our feet are SO IMPORTANT. They do carry us everywhere! Take a moment to thank your feet for all they do!! Now, It is vital that we have our feet in alignment in order to have the rest of our body in alignment. Alignment does truly start with the feet. I’ve blogged about the feet before, so if you would like to read more about that, please click here.
Begin by standing with your feet about 6 inches apart or hip width. Now, when I say hip width people often stand with their feet way too far apart. Our hips aren’t that wide! The femur bone in the leg fits into the hip socket right in the center of our hip or middle of the leg. So for our leg to be in alignment, start at the center of the hip and looked down your leg. It should line up straight down through the knee cap, the center of the ankle, and between the first and second toe. If you put your feet wider than hip-width, then your leg won’t be in alignment.
Look at the top of your foot. Notice that you have a large joint, the metatarsal joint, behind your big toe (#1 below if you are looking at the bottom of the foot). You have another much smaller one behind the pinky toe (the smallest toe - #2 below). Take note of these two spots plus the center of your heel in the back of your foot (#3 below). See if you can stand evenly on all 3 of these places.
A lot of people put more weight into the largest metatarsal joint, which is called pronation. Some people, many of my clients, put more of their weight in the smallest metatarsal joint, called supination. Some people lean forward into their feet and some people lean back. Focus to see if you can put EVEN weight across those 3 points. Sometimes it helps to lean forward, then back, and then side to side to find where CENTER is. Having unequal distribution across your feet can cause all sorts of discomforts like plantar fasciitis, tight calves, and hamstrings, knee pain, low back pain, etc. So do your best to always have even weight distribution in both feet and in both legs. Try this even when you are sitting. Have your feet flat on the floor with equal pressure in both legs and both feet. Give it your best try as it will change your body for the better!!

#2 - Our Head 💁♀️
We are heading now to the top of the body… the head. Do you know that the head weighs 12 pounds when it is in alignment with the spine? It weighs 32 pounds when we begin to push it forward, which often happens when we have rounded shoulders. It also happens sometimes when you are looking at a computer screen, ipad, or phone. The head weighs a whopping 42 pounds when we position it out in front of us or straight down. When you see people looking straight down at their phones they are carring a lot of load with their neck. This is how a lot of people end up with neck pain. See the photo below for what that looks like!
So give yourself a quick look in the mirror while standing sideways. Does your ear line up with the center of your shoulder? Sometimes people try to make this happen by tilting their chin back. Fight the urge! Keep your chin level with the ground. Pull your throat into the back of your neck in order to move your neck back.
This might be one of the hardest ones to correct because it is awkward but you can do it! When you combine this tip with the next one, #3 - the collarbone, it will be come easier to accomplish.

#3 - Our Collarbone 🦴
When we think of good posture, we often think of forcing the shoulders back. I do think that was what we used to be taught. However, that pulls the shoulders out of alignment and we don’t want that! That beautiful wide chest can be obtained by going wide across the collarbone (clavicle). The collarbone is shown in the image below.
Take your fingers and gently feel your collarbone from one end to the other. Create the sensation of feeling wide from end to end of the collarbone. You will feel your shoulders pull back slightly. Whether your a sitting, standing, or lying, you want to feel wide across the entire collarbone. At first, it might feel like a stretch across your chest. In time, it will feel natural and comfortable.

#4 - Our Shoulders 🚶♀️
The emoji above drives me crazy. Emojis now show us walking with poor posture! Nooooo!! Let’s all work on having healthy, beautiful posture, so that this emoji won’t be representative of the population. No more slumping emojis!!!
I mentioned above when talking about the collarbone that we used to be taught to pull our shoulders back for good posture. There’s 2 things wrong with doing that. One, it pulls our shoulders too far back and they become out of alignment. Two, it forces us to pop out our rib cage, which then makes the ribs out of alignment. We don’t want either one.
We want our shoulders resting nicely down our backs. So many people carry tension in their shoulders, which forces their shoulders up by their ears. Carrying our shoulders up causes considerable neck and shoulder pain. It is a common complaint from people when they first come into the studio to start doing Pilates.

Proper alignment is having our shoulders lined up over the center of our rib cage with our shoulders down. Some people do well with imagery, so imagine your shoulders being gently pushed down by a waterfall and the water running down your back. Or, imagine your shoulders as icecream melting down your back. Every time you realize your shoulders are up by your ears or they just feel too high, gently push them down. This will take time, but it will help your neck and shoulder pain immensely! And, it is wonderful for good posture.
#5 - Our Pelvis 🧍🏽♀️
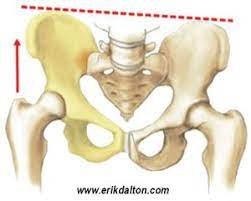
Both females and males often stand and sit with their posture out of alignment. If you look at the people around you and even yourself, you will see it. Most females and sometimes males often stand with one leg jutted out to the side, which shifts their pelvis to one side. Many males and sometimes females, stand with their pelvis pushed forward. See below to get an image of what I’m talking about.

If you look at the model on the right, she has all her weight on her right leg with her right hip lifted. Her pelvis is uneven. In order to stay upright and one with gravity, her shoulders have to shift to the right and are now uneven, and her head has to move the opposite direction. Look at what happens to her spine. It is being forced out of alignment, which is hard on the low back, shoulders, neck, etc. Try to think about that when you are standing in this position.
If you look at the model on the left, she also has most of her weight on one leg with her pelvis pushed forward in sort of a tucked position. This is causing her shoulders to slightly round forward.
Notice your own posture when you are standing in line at the grocery store or any store, when you are brushing your teeth, cooking, or washing dishes. You want to make sure that you standing evenly in your feet like #1 in this blog.
When we stand with our pelvis tilted forward or back or with one side up more than the other, it is hard on our spine. Often this creates back pain, whether that’s the upper, middle, or lower back. If you feel around the top of the pelvis in the front of your body with your hands (some people refer to that as the top of their hip bones), those two bones should line up with one another. Meaning, one shouldn’t be sitting higher than the other. See the first photo below.
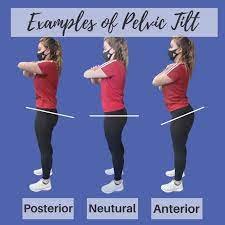
Feel around to the side of the same area you felt above. The top of your hip at the side of your body should be in the center of your side-body. Here’s another way to check it. Create a triangle with your hands by touching your thumbs and then touching your pointer fingers (index fingers). Place the heel of your hands on the front of your hip bones with your thumbs still touching and your index fingers touching your pubic bone. If you are standing, you want your triangle to be perpendicular to the floor. If you are lying on your back, the triangle should be parallel to the floor. How does it look? The angle of the triangle will tell you if you are tilting your pelvis one way or the other. For body alignment and the health of your spine, pelvis, etc you will want to adjust it to align properly. See the example of pelvic tilts in the second photo below. See if you can get your pelvis to a neutral position and if you can hold it there. It will be easier if you have your weight evenly dispersed in your legs and feet (#1), your head in alignment (#2), your collarbone wide (#3), and your shoulders down your back (#4). You can now see how aligned posture is created from your feet all the way up to your head and isn’t just a matter of pulling your shoulders back.
So there you have it!! There’s my top 5 tips to beautiful posture and a straight spine. Try working on one at a time. When you feel like you have greatly improved on one, then move on to the next one. I highly recommend that you start with #1 - the feet and the move on from there.
Need help? Let me know! I’m happy to answer questions or schedule you for an in-studio or virtual session in order to help you work on these 5 tips and more.
If you have any questions, please don’t hesitate to ask me in the comment section below. I’m always happy to help you.
Happy Alignment!!
Joyfully,
Jenny